貳、Building user interfaces with Flutter
我們會用一個購物清單的實作,來帶大家認識元件在Flutter中的相互使用與堆疊。並且,在接下來的章節中,我們會將視野著重於程式構造,將不再細講單一特定元件的屬性與使用方式!
為了應對更加複雜的使用者互動,我們會使用「State(狀態)」來區分元件,最顯而易見的,就是使用Stateless與Stateful 元件。值得注意的是,我們先前介紹元件時大多都是使用「無狀態」的方式。
Stateless(無狀態)元件特性
不可變性(Immutability):一旦創建,其屬性和內容不能被更改。它的配置在創建後保持不變。
無內部狀態(No Internal State):它不維護任何關於自身狀態的資訊。它的外觀和內容完全由其屬性和外部數據決定。
輕量(Lightweight):由於它們是不可變的且不需維護內部狀態,StatelessWidget通常相較StatefulWidget輕量。
適用情境:適用於渲染過程中不會更改的UI元件,如靜態文字、按鈕、圖片等。
Stateful(有狀態)元件特性
可變性(Mutability):可以在渲染過程中修改其屬性,並且可以維護內部狀態。
有內部狀態(Internal State):具有一個對應的State對象,該State對象負責管理和維護元件的內部狀態。
適用情境:適用於渲染過程中需要根據用戶動作而有變化的UI元件,例如表單輸入、動畫、計數器等。
SetState特性
在StatefulWidgets中,會有setState()函數,當執行到該所屬函數時,會根據改變的狀態重新做UI的建構渲染
1
2
3
4
5
| void _increment() {
setState(() { //使用setState,以告訴Flutter框架狀態已經改變,需要重新構建UI以反映變化
_counter++;
});
}
|
Stateful使用範例
我們拿一個使用ElevatedButton的計數器程式作為說明。
Counter類別: 是一個StatefulWidget。
_CounterState類別: 是Counter的內部狀態,在這個類別內有_increment()函式
_increment()函式: 裡面有setState()用於放置對變數_counter的變化行為
ElevatedButton: 裡面的onPressed,會呼叫一次_increment()函式
所以當程式執行時,會先建構初始化的計數器畫面,並隨著使用者點擊按鈕,呼叫_increment(),並由setState更新累計的次數,並顯示當前的次數在畫面上。
1
2
3
4
5
6
7
8
9
10
11
12
13
14
15
16
17
18
19
20
21
22
23
24
25
26
27
28
29
30
31
32
33
34
35
36
37
38
39
40
41
42
43
44
45
| import 'package:flutter/material.dart';
class Counter extends StatefulWidget {
const Counter({super.key});
@override
State<Counter> createState() => _CounterState();
}
class _CounterState extends State<Counter> {
int _counter = 0;
void _increment() {
setState(() { //我們使用setState,以告訴Flutter框架狀態已經改變,需要重新構建UI以反映變化
_counter++;
});
}
@override
Widget build(BuildContext context) {
return Row(
mainAxisAlignment: MainAxisAlignment.center,
children: <Widget>[
ElevatedButton(
onPressed: _increment,//重新呼叫一次setState(),更新_counter
child: const Text('Increment'),
),
const SizedBox(width: 16),
Text('Count: $_counter'),
],
);
}
}
void main() {
runApp(
const MaterialApp(
home: Scaffold(
body: Center(
child: Counter(),
),
),
),
);
}
|
Stateful使用範例
二、Bringing it all together
我們回到購物車的範例,我們先設計出購物車項目的規劃,並且目前用inCart變數手動設為”false”,”true”來建構
Product類別:這是一個用來表示產品的簡單類別,它具有一個name屬性,表示產品的名稱。
CartChangedCallback:用於通知當前產品的購物車狀態是否發生變化。
ShoppingListItem類別:這是一個自定義的StatelessWidget,用於顯示購物清單中的每個項目。
1
2
3
4
5
6
7
8
9
10
11
12
13
14
15
16
17
18
19
20
21
22
23
24
25
26
27
28
29
30
31
32
33
34
35
36
37
38
39
40
41
42
43
44
45
46
47
48
49
50
51
52
53
54
55
56
57
58
59
60
61
62
63
64
65
66
67
| import 'package:flutter/material.dart';
class Product {
const Product({required this.name});//產品名稱
final String name;
}
typedef CartChangedCallback = Function(Product product, bool inCart);
class ShoppingListItem extends StatelessWidget {
ShoppingListItem({
required this.product,
required this.inCart,
required this.onCartChanged,
}) : super(key: ObjectKey(product));
final Product product;
final bool inCart; //表示產品是否已經添加到購物車
final CartChangedCallback onCartChanged;//當用戶點擊清單項目時,更新購物車狀態。
Color _getColor(BuildContext context) {//設定購物車內的項目顏色
return inCart //購物車回傳值
? Colors.black54
: Theme.of(context).primaryColor;
}
TextStyle? _getTextStyle(BuildContext context) {
if (!inCart) return null;
return const TextStyle(
color: Colors.black54,
decoration: TextDecoration.lineThrough,
);
}
@override
Widget build(BuildContext context) {
return ListTile(
onTap: () {
onCartChanged(product, inCart);
},
leading: CircleAvatar(
backgroundColor: _getColor(context),
child: Text(product.name[0]),
),
title: Text(product.name, style: _getTextStyle(context)),
);
}
}
void main() {
runApp(
MaterialApp(
home: Scaffold(
body: Center(
child: ShoppingListItem(
product: const Product(name: 'Chips'),
inCart: true,//為false時是藍色、為true時是劃掉且顏色為灰色
onCartChanged: (product, inCart) {},
),
),
),
),
);
}
|
ShoppingListItem使用範例(Stateless,無狀態模式)
inCart true的情況

inCart false的情況

_handleCartChanged函數,進行互動更新
我們現在新增一個_handleCartChanged函數,使用setState()來控制每次的點擊互動更新,我們讓按鈕被點擊時固定呼叫此函數去更新inCart的Boolean值,點擊一次會使其「移除」、再次進行點擊則會「加回」
1
2
3
4
5
6
7
8
9
| void _handleCartChanged(Product product, bool inCart) {
setState(() {
if (!inCart) {
_shoppingCart.add(product);
} else {
_shoppingCart.remove(product);
}
});
}
|
_handleCartChanged函數
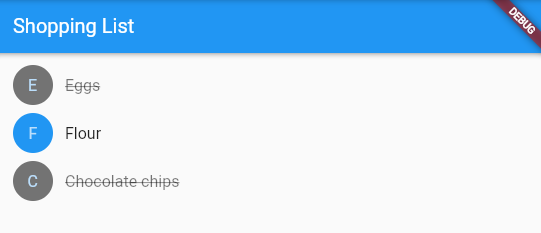
我們將剛剛Stateless的範例轉為使用Stateful來達成使用者動態更新購物車狀態,由剛剛的程式,我們可以新增_handleCartChanged函數處理購物車狀態,並設定三項購物車內容做demo
1
2
3
4
5
6
7
8
9
10
11
12
13
14
15
16
17
18
19
20
21
22
23
24
25
26
27
28
29
30
31
32
33
34
35
36
37
38
39
40
41
42
43
44
45
46
47
48
49
50
51
52
53
54
55
56
57
58
59
60
61
62
63
64
65
66
67
68
69
70
71
72
73
74
75
76
77
78
79
80
81
82
83
84
85
86
87
88
89
90
91
92
93
94
95
96
97
98
99
100
101
102
103
104
105
106
107
108
109
| import 'package:flutter/material.dart';
class Product {
const Product({required this.name});
final String name;
}
typedef CartChangedCallback = Function(Product product, bool inCart);
class ShoppingListItem extends StatelessWidget {
ShoppingListItem({
required this.product,
required this.inCart,
required this.onCartChanged,
}) : super(key: ObjectKey(product));
final Product product;
final bool inCart;
final CartChangedCallback onCartChanged;
Color _getColor(BuildContext context) {
return inCart //
? Colors.black54
: Theme.of(context).primaryColor;
}
TextStyle? _getTextStyle(BuildContext context) {
if (!inCart) return null;
return const TextStyle(
color: Colors.black54,
decoration: TextDecoration.lineThrough,
);
}
@override
Widget build(BuildContext context) {
return ListTile(
onTap: () {
onCartChanged(product, inCart);
},
leading: CircleAvatar(
backgroundColor: _getColor(context),
child: Text(product.name[0]),
),
title: Text(
product.name,
style: _getTextStyle(context),
),
);
}
}
class ShoppingList extends StatefulWidget {
const ShoppingList({required this.products, super.key});
final List<Product> products;
@override
State<ShoppingList> createState() => _ShoppingListState();
}
class _ShoppingListState extends State<ShoppingList> {
final _shoppingCart = <Product>{};
void _handleCartChanged(Product product, bool inCart) { //處理購物車狀態
setState(() {
if (!inCart) {
_shoppingCart.add(product);
} else {
_shoppingCart.remove(product);
}
});
}
@override
Widget build(BuildContext context) {
return Scaffold(
appBar: AppBar(
title: const Text('Shopping List'),
),
body: ListView(
padding: const EdgeInsets.symmetric(vertical: 8),
children: widget.products.map((product) {
return ShoppingListItem(
product: product,
inCart: _shoppingCart.contains(product),
onCartChanged: _handleCartChanged,
);
}).toList(),
),
);
}
}
void main() {
runApp(const MaterialApp(
title: 'Shopping App',
home: ShoppingList(
products: [
Product(name: 'Eggs'),
Product(name: 'Flour'),
Product(name: 'Chocolate chips'),
],
),
));
}
|
ShoppingListItem使用範例(Stateful,有狀態模式)